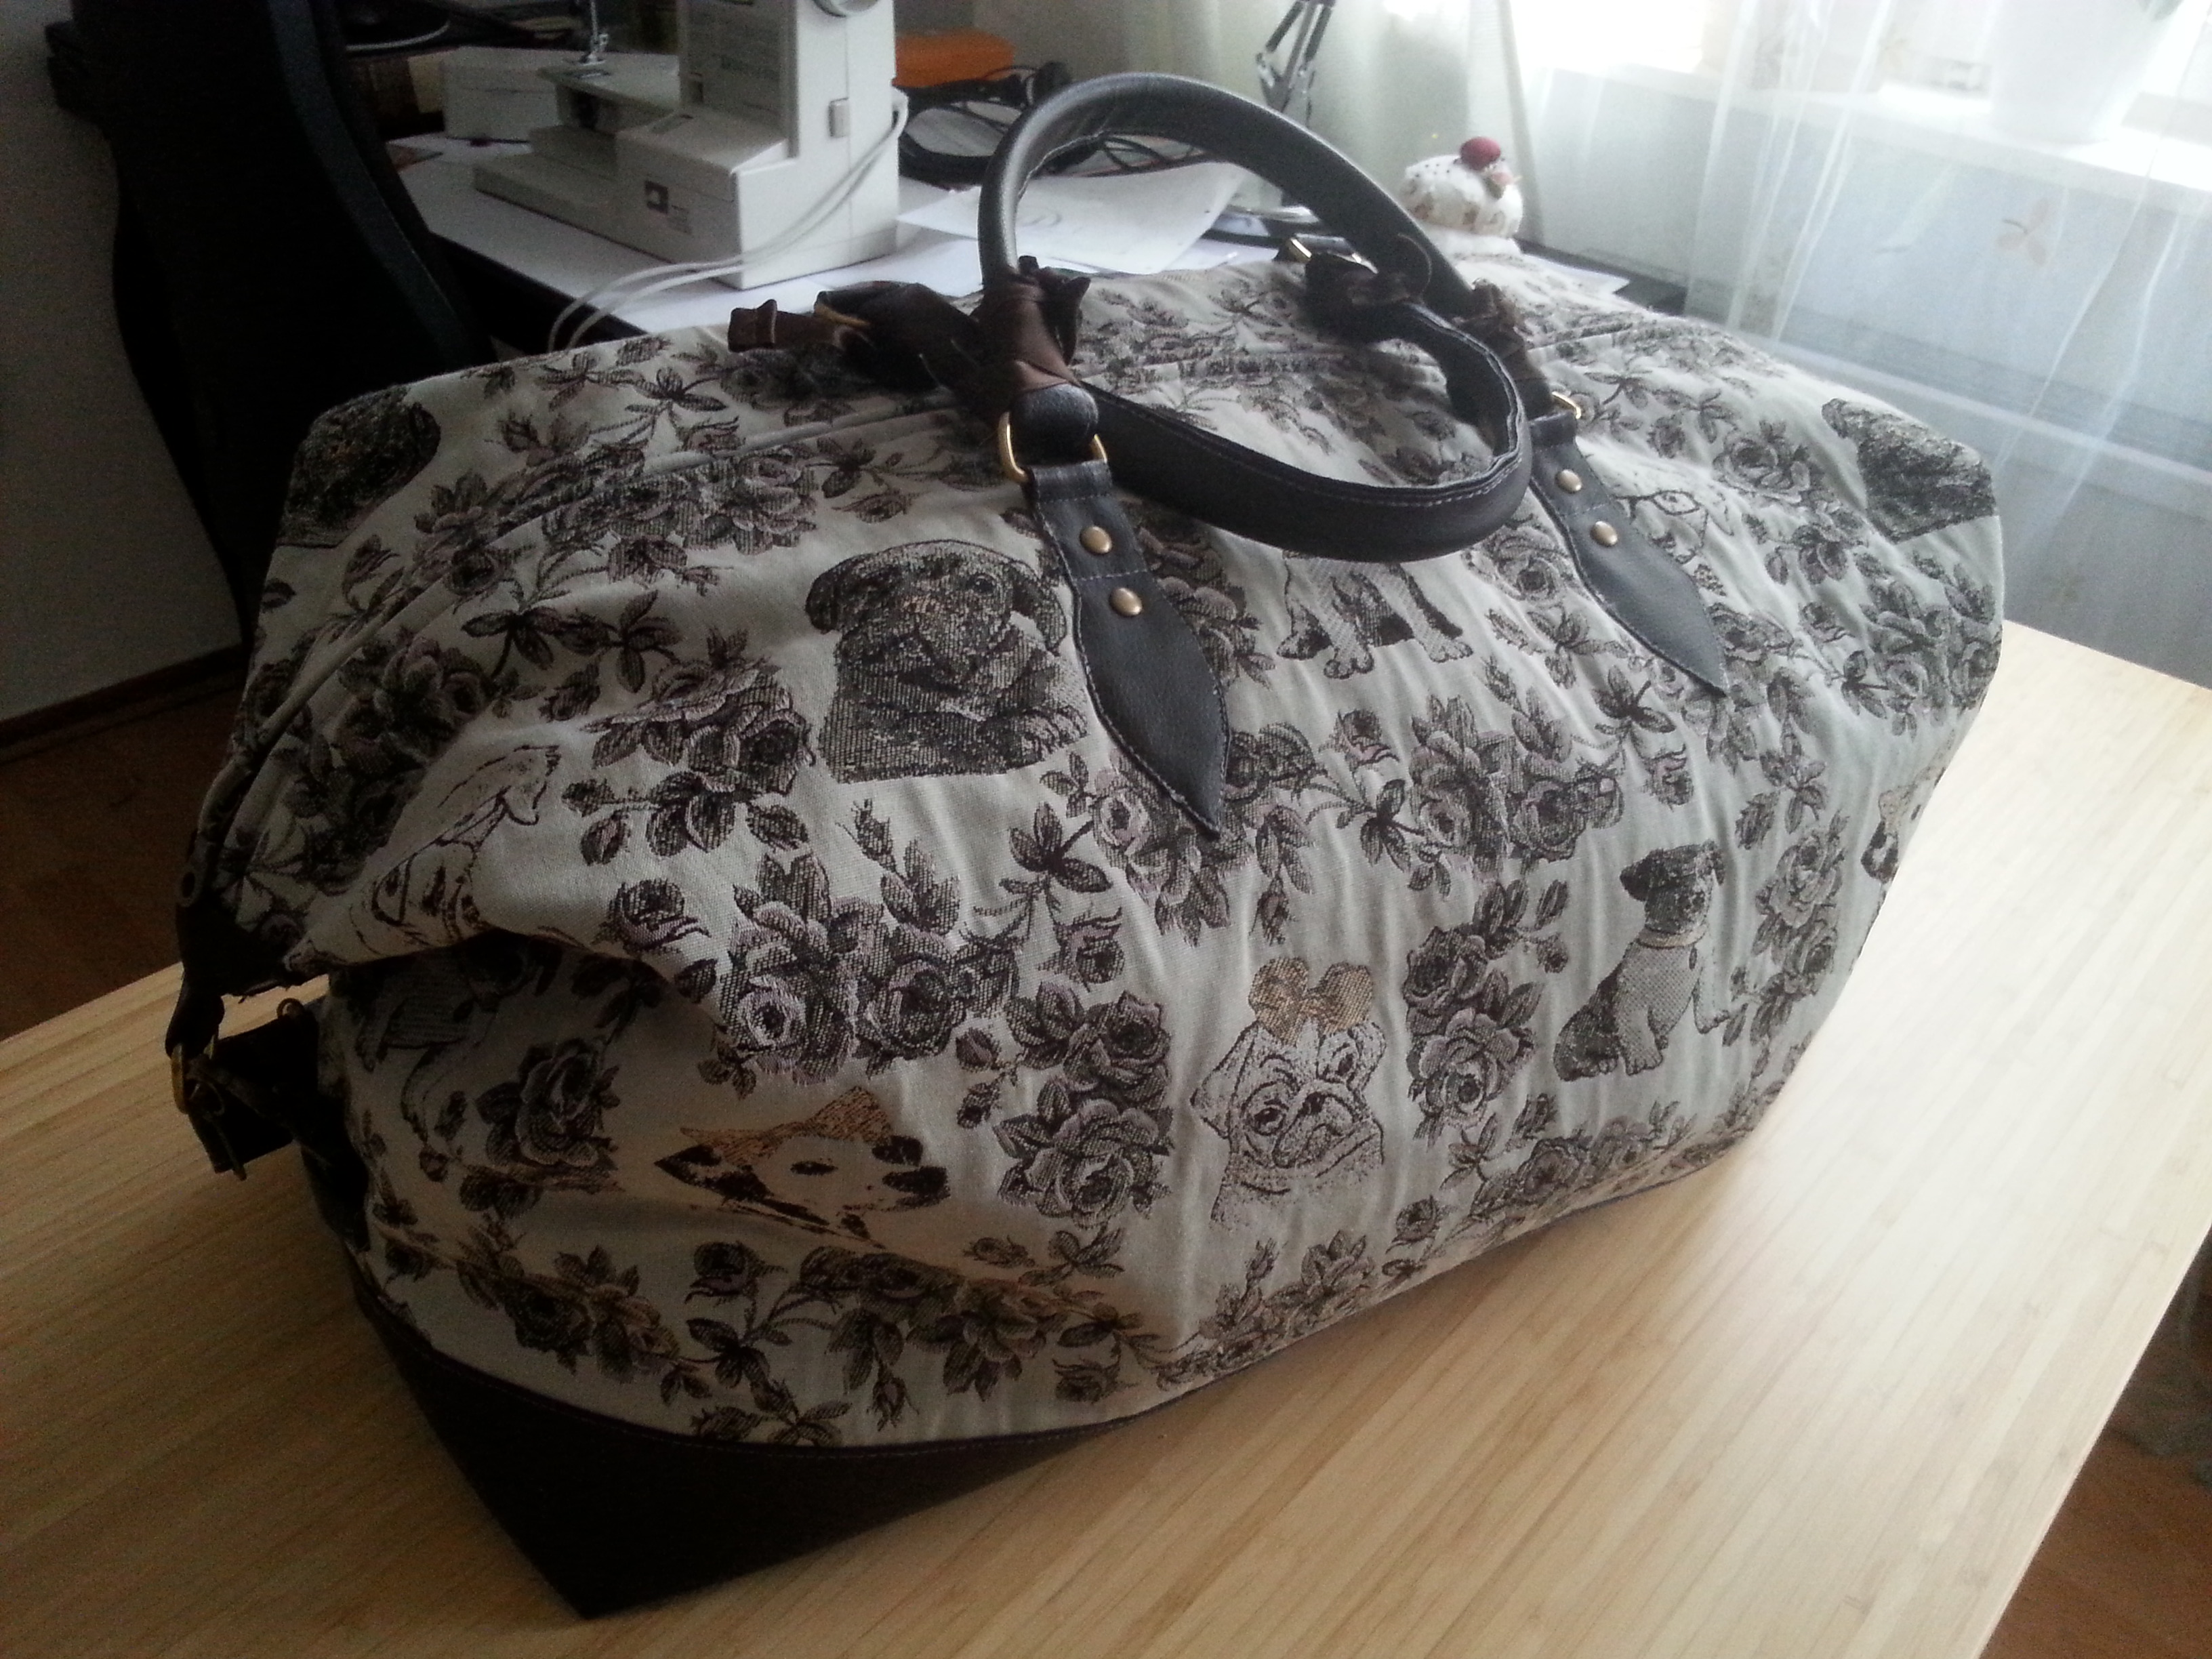
Last month, I started sewing this weekender (as part of my first selfmade set of matching bags/ purses). It really cost some nerve and patience, but here it is at last. It measures 52 x42 x23cm and is perfect for a 2-4 day trip.


There are so many possibilities for choosing fabric. I wanted something rather fancy, and found this dog pattern. I really wasn´t sure if I found it very terrible or very cool, and decided for the latter. But of course, feel free in choosing whatever fabric, lining, etc. suits best in your opinion  I would love to see a photo of your project and publish it in the article 😉
xx
You need a lot of patience and also some experience in sewing for this pattern. If there is something unclear in the instructions, please write it in the comments /send me a message.
Cut:
2 times 77cm x 53,5cm of fabric, lining, fusible fleece, interfacing for the main body
2 times 77cm x 19cm of faux leather for the main body
2 times 10cm x 10cm of faux leather for the upper straps
4 times 5,2 x 12cm of faux leather for the short side straps
2 times 4,8 x 8cm of faux leather for the transverse straps
1 time 92 x 13,2cm of faux leather for the adjustable strap
1 time 88 x 1,6cm of fleece for the adjustable strap
2 times 20cm x 46cm of faux leather for the piped straps
1 time 21 x 30cm of lining for the inserted pocket
55x24cm of fabric you´ve got left from another project, for example cotton or linen, for the bag bottom cover (it won´t be visible afterwards)
4 times the shape of the template + 1cm seam allowance (see below for the download, compare these measures to be sure the template has been downloaded in the right size: 13,7cm long, 2,5 cm wide at the straight area, 3,8cm wide at widest area)
1,5cm seam allowance included unless stated otherwise.
There are a lot of different pieces, so I recommend labelling the different parts with tailor´s chalk/ removable marker.
You will also need:
6 D-Rings, 2,5cm wide at straight side
4 snap hooks, it´s rings as wide as the width of the adjustable strap (maybe 1 or 2 mm smaller)
8 rivets
1 zipper 70cm long
52x21cm bag bottom
4 bag feet
1. Iron the interfacing to the matching fabric pieces and the fusible fleece on top
2. Take the faux leather pieces for the main body WSU and fold in one of the long sides 1,5cm. Faux leather might melt when pressed, so instead of pressing, I hold it in place with adhesive tape. Also avoid using pins when working with faux leather, since the incisions will remain after removing the pins.
3. Match the raw edges of the faux leather with the raw edges of the main body fabric pieces. Topstitch the folded edges with a 1 or 2mm seam allowance and sew the raw edges with a 1cm seam allowance. The leather-/fabric-pieces of the main body will be treated as one in the following.
4. Take the fabric pieces for the main body and match the raw edges RST. Sew along one long and both short sides. Sew only about 4,5cm from each side on the last long one.
5. Take one of the lining pieces for the inserted pocket and place it on one of the lining pieces for the main body, both are facing RSU. Place the pocket piece in the center of the main body, with the raw edge 6cm away from the upper side. Draw a box 4cm down from the raw edge of the pocket piece, 25cm wide and 1cm long. Attach the pieces to each other by sewing on top of the box.
Draw a horizontal line in the middle of the box, stopping 1cm from each short side. Connect the endings of the line with the corners of the box with 4 small lines. Cut along the long and short lines, careful not to cut the seam. Now reach with your hand from the back through the hole, grasp the pocket piece and pull it through. Iron the edges of the box. Match the other pocket piece with the one already attached RST and stitch. You have an inserted pocket.
Repeat point 4 with the lining pieces.
6. Take the main body and lay it flat WSO in front of you. Reach in one of the lower corners and match the side seam with the bottom seam. (Pin the seams on top of each other for working accurate) Put the piece flat in front of you, so the lower bag corner is now the upper angle of a triangle that is parted in two halves by the seam.


7. Measure 11,5cm from the corner along the seams and make a line in a 90° angle to the seam . Stitch along the line. Use the new seam as a folding line and pin the triangle to the bottom. Sew on top of the vertical triangle seam to secure it invisibly to the bottom. Repeat with the other corner.
8. Repeat with the lining.
9. Insert the bag feet into the bottom, about 6,5cm away from the edges.
10. Take the pieces for the bag bottom cover and sew them RST, leaving one of the short sides open. Put the bottom in the cover, fold the raw edges of the opening 1,5cm in and sew shut.
11. Take the pieces for the short side straps. Again, it might cause problems to press fake leather, so create creases with your thumb or use adhesive tape to hold everything in place.
Fold each short edge in 1cm and secure with tape. Fold the piece in half lengthways, create a crease and open again. Fold each long side to the centre crease, and fold again at the centre crease. Topstitch along all edges with a 1-2mm seam allowance. Repeat with the other 3 strap pieces.


12. Take two snap hooks and thread 2 of the short straps in each. Sew the straps to the bag sides, 2cm away from the faux leather and each one 3,5mm away from the side seam (-> 7mm space between both straps). Repeat with the other side.
13. Take the pieces for the transverse straps and follow step 11. Take one of the straps and place crosswise on the short side straps, hiding the seam that attaches the straps to the bag under it. Repeat with the other side.
14. Take the pieces you cut out with the template WSU and fold in one cm on all sides except the upper short one. Thread the piece through a D-Ring and fold in 2,5cm on the short side, creating a loop for the D-Ring. With the D-Ring attached, sew the piece in place 28cm from the side seams and 6cm from the upper raw edge. Topstitch with a 2mm seam allowance around all edges, leaving a small loop for the D-Ring. Make another seam for securing 2,4cm below the upper one. Put a rivet in the center of the box and about 1cm bellow the lower seam (measuring from the middle of the second rivet) Repeat with the other 3 pieces from the template.
15. Take the pieces for the piped handles and follow step 10.
Take the straps and fold in half again. Create a tunnel by topstitching the open long sides on each other, stopping 5cm from the short end. Insert your piping, fold one of the open endings around one of the D-Rings attached to the bag and shove it a bit into the tube. Sew shut. Repeat with the other open end.
Repeat with the other strap.
16. Take the fabric main body. Fold the upper edge in 1,5cm, press and baste. Repeat with the lining.
17. With the fabric piece RSO and the lining piece WSO, put the lining bag in the fabric bag with the covered bottom between them. Take the zipper and pin it to the edges of the fabric bag, then pin again to attach the lining to it, too. By pinning, be careful that the fabric edges cover the zipper. Also be careful that you place the lining not directly under, but sideways from the zipper to prevent it from getting stuck when closing the back. Stitch with your zipper foot next to the zipper. Carefully, remove the basting thread.
18. Take the pieces for the upper straps and follow step 10. Thread a D-Ring on each and place them directly on top of the upper corners with the D-Rings facing away from the bag. Make a seam on the short ends.


19. Fold in the first cm of your satin binding in a 90° angle. Take the upper bag corner and put it in front of you. Pin the folded edge of the binding on the edge of one triangle and sew. Cut of as much as you need to reach the other side of the triangle and fold the other side in a 90° angle. Hide the seams of the upper straps under the satin. In the same way, sew satin binding to the other side of the triangle.

Repeat with the other corner.
20. Take the pieces for the adjustable strap. Follow step 10, but before folding it for the last time, put a piece of fleece/etc. as long as the strap and half as wide between the layers for comfort. Thread the strap RSU through the slider, then through one of the snap hooks. With WSU, thread it again through the central bar of the slider. Pull the end through for about 4cm, then fold it back on the WS of the strap and sew it shut. Thread the other end through the other snap hook, fold the free end back and sew it shut.
21. Take the satin binding, wind it around the transverse seam of one of the piped handles and make a double ribbon. I wound it and made the ribbons first, then cut it off. Fold in the short edges twice (but quite slim) and topstitch with a 2-4mm seam allowance (depending on how slim you folded in). Repeat with the other three piped handle seams.
22. Hook the upper corners to the D-Rings on the sides and also hook your adjustable strap in.

Hi, this is a comment.
To delete a comment, just log in and view the post's comments. There you will have the option to edit or delete them.